[Linux 기초] 14. 압축 및 백업
카테고리: LINUX
태그: linux
01. gzip / gunzip
-
리눅스에서 범용적으로 사용되는 압축 프로그램
-
일반적으로 tar로 묶여진(archive) 파일의 용량을 줄이기 위한 목적으로 사용 됨
-
압축 파일을 생성할 때 기본값으로 “.gz” 확장자를 붙여 줌
■ 사용법
$ gzip [옵션] <파일 이름>
| 옵션 | 설명 |
|---|---|
| -n [1~9] | 압축 수행 시 처리 속도 조정(1 : 가장 빠른 압축, 9 : 가장 느린 압축) |
| -c | 압축의 결과를 출력하고 원본파일을 보존 함 |
| -d | 압축 해제(=gunzip) |
| -f | 시스템이 사용중인 파일을 압축하는 등의 강제 압축 |
| -l | (소문자 L) 압축 파일의 정보 확인 - compressed : 압축 된 후의 용량 - uncompressed : 압축 되기 전의 용량 - ratio : 압축 효율 - uncompressed_name 압축 되지 전의 파일 이름 |
| -r | 한번에 여러 개의 파일의 압축(디렉터리에 포함된 모든 파일 압축) |
| -t | 압축 파일 테스트 (-v 옵션과 함께 사용해야 함) |
| -v | 자세한 정보 출력 |
■ 예시
$ mkdir backup

$ truncate -s 100M backup/test{1..5}.txt

$ ls -al backup/
total 0
drwxr-xr-x. 2 root root        91 Apr 20 21:55 .
dr-xr-x---. 3 root root       165 Apr 20 21:55 ..
-rw-r--r--. 1 root root 104857600 Apr 20 21:55 test1.txt
-rw-r--r--. 1 root root 104857600 Apr 20 21:55 test2.txt
-rw-r--r--. 1 root root 104857600 Apr 20 21:55 test3.txt
-rw-r--r--. 1 root root 104857600 Apr 20 21:55 test4.txt
-rw-r--r--. 1 root root 104857600 Apr 20 21:55 test5.txt

$ tar -cf backup.tar backup/*

$ ls -al
total 512016
-rw-------. 1 root root      1009 Apr 13 00:14 anaconda-ks.cfg
drwxr-xr-x. 2 root root        91 Apr 20 21:55 backup
-rw-r--r--. 1 root root 524298240 Apr 20 21:56 backup.tar

$ gzip backup.tar

$ ls -al
total 504
-rw-------. 1 root root   1009 Apr 13 00:14 anaconda-ks.cfg
drwxr-xr-x. 2 root root     91 Apr 20 21:55 backup
-rw-r--r--. 1 root root 509269 Apr 20 21:56 backup.tar.gz

$ gunzip backup.tar.gz

$ ls -al
total 512044
dr-xr-x---.  3 root root       183 Apr 20 21:57 .
dr-xr-xr-x. 18 root root       235 Apr 20 21:54 ..
-rw-------.  1 root root      1009 Apr 13 00:14 anaconda-ks.cfg
drwxr-xr-x.  2 root root        91 Apr 20 21:55 backup
-rw-r--r--.  1 root root 524298240 Apr 20 21:56 backup.tar
02. bzip2 / bunzip2
-
압축률은 gzip보다 좋지만 처리속도가 느림
-
압축에 사용되는 알고리즘(BWT)의 특허 때문에 라이선스를 잘 확인하고 이용해야 함
-
압축 파일을 생성할 때 기본적으로 “.bz2” 확장자를 붙여 줌
■ 사용법
$ bzip2 [옵션] <파일 이름>
| 옵션 | 설명 |
|---|---|
| -t | 압축 파일 테스트 |
| -d | 압축 해제 |
| -f | 강제 압축 |
| -v | 자세한 정보 출력 |
■ 예시
$ bzip2 backup.tar

$ ls -al
total 36
dr-xr-x---.  3 root root  187 Apr 20 22:00 .
dr-xr-xr-x. 18 root root  235 Apr 20 21:54 ..
-rw-------.  1 root root 1009 Apr 13 00:14 anaconda-ks.cfg
drwxr-xr-x.  2 root root   91 Apr 20 21:55 backup
-rw-r--r--.  1 root root  849 Apr 20 21:56 backup.tar.bz2

$ bunzip2 backup.tar.bz2

$ ls -al
total 512044
dr-xr-x---.  3 root root       183 Apr 20 22:01 .
dr-xr-xr-x. 18 root root       235 Apr 20 21:54 ..
-rw-------.  1 root root      1009 Apr 13 00:14 anaconda-ks.cfg
drwxr-xr-x.  2 root root        91 Apr 20 21:55 backup
-rw-r--r--.  1 root root 524298240 Apr 20 21:56 backup.tar
03. tar
-
초기에 tape backup을 목적으로 사용 되었음
-
많은 양의 파일을 하나의 큰 파일로 묶어주기 위해 사용 됨
-
파일 배포 시 많이 사용 됨
-
내부 옵션을 통해 gzip 또는 bzip2 압축을 지원 함
# 압축 생성
$ tar [옵션] <생성할 tar파일 이름> <묶을 파일 이름>

# 압축 해제
$ tar [옵션] <tar파일 이름> –C <해제할 경로>
■ 사용법
| 옵션 | 설명 |
|---|---|
| -c | 정의한 파일 이름으로 파일을 묶음 |
| -f | 옵션 뒤에 tar 파일을 명시하고 있음 |
| -v | 자세한 내용 출력 |
| -t | tar 파일의 내용 출력 |
| -x | tar 파일에서 정의된 파일을 추출 |
| -u | 이미 tar 파일에 포함된 파일보다 더 최근의 파일로 변경 |
| -r | 생성될 tar 파일의 제일 끝 부분에 tar 확장자 명시 |
| -p | 원본 파일의 permission 유지 |
| -C | tar 파일이 해제될 위치 지정 |
| -b | 블록 단위로 작업 |
| -g | 증분 백업 |
| -z | tar로 묶여진 파일을 gzip으로 압축하여 최종 파일을 생성 |
| -j | tar로 묶여진 파일을 bzip2로 압축하여 최종 파일을 생성 |
■ 예시
# 지정한 파일 묶기
$ tar -cvf <생성할 tar파일 이름> <묶을 파일 이름 또는 디렉터리>

# 지정한 파일 묶기 + gzip 압축
$ tar -zcvf <생성할 tar파일 이름> <묶을 파일 이름 또는 디렉터리>

# 지정한 파일 묶기 + bzip2 압축
$ tar -jcvf <생성할 tar파일 이름> <묶을 파일 이름 또는 디렉터리>

# 지정한 파일 묶기 해제
$ tar -xvf <해제할 tar파일 이름>

# 지정한 파일 묶기 해제 + gzip 압축 해제
$ tar -zxvf <해제할 tar파일 이름>

# 지정한 파일 묶기 해제 + bzip2 압축 해제
$ tar -jxvf <해제할 tar파일 이름>
04. dump / restore
dump 명령은 EXT 파일시스템을 백업하기 위해 사용되는 명령이고, restore 명령은 dump 명력으로 백업한 것을 복구하기 위해 사용되는 명령이다.
- xfs 파일 시스템 백업하기 위해 사용하는 xfsdump / xfsrestore 명령도 있으며, 사용방법은 같다.
| 종류 | 설명 |
|---|---|
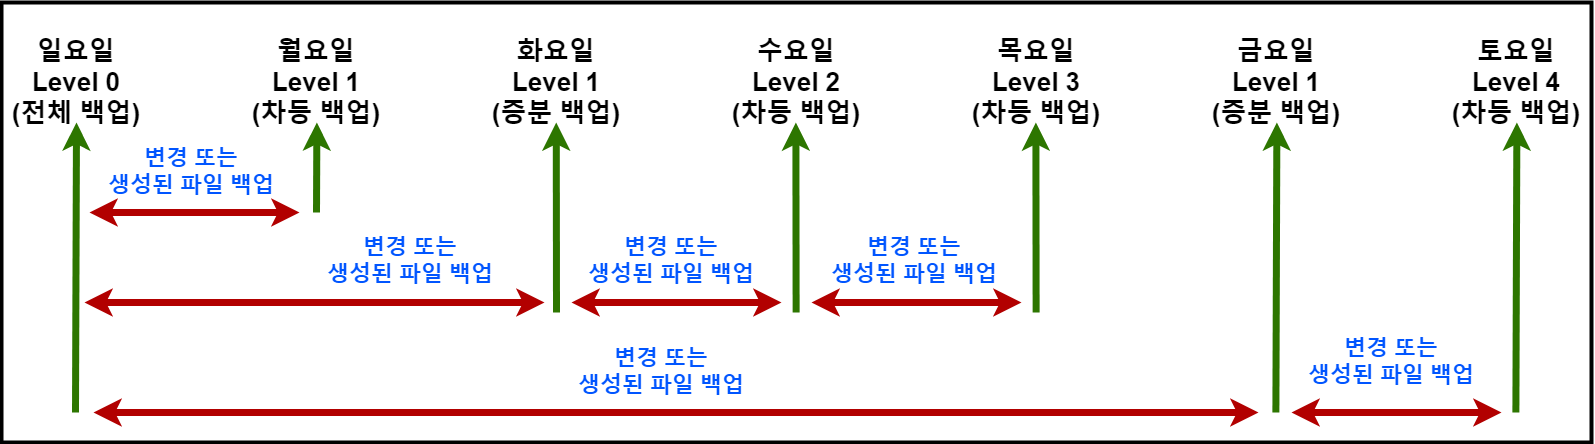
| 전체 백업 | 모든 데이터를 백업 |
| 증분 백업 | 변경된 데이터만을 백업 |
| 증감 백업 | 증분 백업의 종류로, 그날의 증가분만 백업 |
| 누적 백업 | 증분 백업의 종류로, 전체 백업 이후에 변경된 모든 데이터를 백업 |
| 차등 백업 | 변경된 데이터에 대한 모든 데이터를 백업 (전체 백업 이후의 변경된 모든 데이터를 백업한다고 생각하면 됨) |
■ dump 명령 - 사용법
$ dump [options] -f DeviceName FileSystem
| 옵션 | 설명 |
|---|---|
| -0~9 | 백업 레벨을 나타내며, 0은 전체 백업을 1~9는 숫자 조합을 통해 차등 또는 증분 백업을 나타낸다. |
| -u | 변경된 파일만 대상으로 백업을 수행합니다. |
| -f DeviceName | 백업 파일의 경로와 이름을 지정합니다. |
| -S | 실제 백업은 하지 않고 백업 시 필요한 용량을 알아보기 위해 사용 |
| -C | 백업 파일을 생성하기 전에 현재 디렉토리를 변경합니다. |
| -b | 백업 파일의 블록 크기를 지정합니다. 기본값은 10,000입니다. |
| -z | 백업 파일을 압축하여 저장합니다. |
| -v | 백업 과정을 상세하게 출력합니다. |
| -W | 백업 중에 경고 메시지를 출력하지 않습니다. |
| -h | 도움말을 출력합니다. |
- 백업 레벨을 나타내는 번호가 어떻게 정용되는지 확인한다.
■ 예시
예시하기 전 사전 작업 - https://revenge1005.github.io/rocky/ch01-13/
$ df -h /test
Filesystem      Size  Used Avail Use% Mounted on
/dev/sda1       9.8G   24K  9.3G   1% /test


# dump 명령 설치
$ yum install epel-release; yum repolist; yum install dump

# 백업 디렉터리 생성
$ mkdir /backup

# /test 파일 시스템에 파일을 생성 후, 백업 진행
$ cd /test

# truncate 명령으로 100M 크기의 test1.txt ~ test5.txt 파일을 생성 후, dump 명령을 사용해 /dev/nst0 테이프 디바이스로 전체 백업 실행
$ truncate -s 100M test{1..5}.txt

$ ls -al
total 20
drwxr-xr-x.  3 root root      4096 Apr 20 23:01 .
dr-xr-xr-x. 19 root root       248 Apr 20 22:54 ..
drwx------.  2 root root     16384 Apr 20 22:53 lost+found
-rw-r--r--.  1 root root 104857600 Apr 20 23:01 test1.txt
-rw-r--r--.  1 root root 104857600 Apr 20 23:01 test2.txt
-rw-r--r--.  1 root root 104857600 Apr 20 23:01 test3.txt
-rw-r--r--.  1 root root 104857600 Apr 20 23:01 test4.txt
-rw-r--r--.  1 root root 104857600 Apr 20 23:01 test5.txt

$ dump -0uf /backup/test_L0_20220522.dump /test/
  DUMP: Date of this level 0 dump: Sat Apr 22 13:28:37 2023
  DUMP: Dumping /dev/sda1 (/test) to /backup/test_L0_20220522.dump
  DUMP: Label: none
  DUMP: Writing 10 Kilobyte records
  DUMP: mapping (Pass I) [regular files]
  DUMP: mapping (Pass II) [directories]
  DUMP: estimated 1186 blocks.
  DUMP: Volume 1 started with block 1 at: Sat Apr 22 13:28:37 2023
  DUMP: dumping (Pass III) [directories]
  DUMP: dumping (Pass IV) [regular files]
  DUMP: Closing /backup/test_L0_20220522.dump
  DUMP: Volume 1 completed at: Sat Apr 22 13:28:37 2023
  DUMP: Volume 1 1190 blocks (1.16MB)
  DUMP: 1190 blocks (1.16MB) on 1 volume(s)
  DUMP: finished in less than a second
  DUMP: Date of this level 0 dump: Sat Apr 22 13:28:37 2023
  DUMP: Date this dump completed:  Sat Apr 22 13:28:37 2023
  DUMP: Average transfer rate: 0 kB/s
  DUMP: DUMP IS DONE


# test4.txt 수정시간을 변경, test6.txt 파일을 생성 후, 증감 백업(Level 1) 실행
$ touch /test/test4.txt /test/test6.txt

$ dump 1uf /backup/test_L1_20220522.dump /test
  DUMP: Date of this level 1 dump: Sat Apr 22 13:29:33 2023
  DUMP: Date of last level 0 dump: Sat Apr 22 13:28:37 2023
  DUMP: Dumping /dev/sda1 (/test) to /backup/test_L1_20220522.dump
  DUMP: Label: none
  DUMP: Writing 10 Kilobyte records
  DUMP: mapping (Pass I) [regular files]
  DUMP: mapping (Pass II) [directories]
  DUMP: estimated 380 blocks.
  DUMP: Volume 1 started with block 1 at: Sat Apr 22 13:29:33 2023
  DUMP: dumping (Pass III) [directories]
  DUMP: dumping (Pass IV) [regular files]
  DUMP: Closing /backup/test_L1_20220522.dump
  DUMP: Volume 1 completed at: Sat Apr 22 13:29:33 2023
  DUMP: Volume 1 380 blocks (0.37MB)
  DUMP: 380 blocks (0.37MB) on 1 volume(s)
  DUMP: finished in less than a second
  DUMP: Date of this level 1 dump: Sat Apr 22 13:29:33 2023
  DUMP: Date this dump completed:  Sat Apr 22 13:29:33 2023
  DUMP: Average transfer rate: 0 kB/s
  DUMP: DUMP IS DONE


# test7 파일 생성 후, 증감 백업
$ touch /test/test7.txt


$ dump 2uf /backup/test_L2_20220522.dump /test
  DUMP: Date of this level 2 dump: Sat Apr 22 13:32:10 2023
  DUMP: Date of last level 1 dump: Sat Apr 22 13:29:33 2023
  DUMP: Dumping /dev/sda1 (/test) to /backup/test_L2_20220522.dump
  DUMP: Label: none
  DUMP: Writing 10 Kilobyte records
  DUMP: mapping (Pass I) [regular files]
  DUMP: mapping (Pass II) [directories]
  DUMP: estimated 179 blocks.
  DUMP: Volume 1 started with block 1 at: Sat Apr 22 13:32:10 2023
  DUMP: dumping (Pass III) [directories]
  DUMP: dumping (Pass IV) [regular files]
  DUMP: Closing /backup/test_L2_20220522.dump
  DUMP: Volume 1 completed at: Sat Apr 22 13:32:10 2023
  DUMP: Volume 1 180 blocks (0.18MB)
  DUMP: 180 blocks (0.18MB) on 1 volume(s)
  DUMP: finished in less than a second
  DUMP: Date of this level 2 dump: Sat Apr 22 13:32:10 2023
  DUMP: Date this dump completed:  Sat Apr 22 13:32:10 2023
  DUMP: Average transfer rate: 0 kB/s
  DUMP: DUMP IS DONE


$ ls -l /backup/test*
-rw-r--r--. 1 root root 1218560 Apr 22 13:28 /backup/test_L0_20220522.dump
-rw-r--r--. 1 root root  389120 Apr 22 13:29 /backup/test_L1_20220522.dump
-rw-r--r--. 1 root root  184320 Apr 22 13:32 /backup/test_L2_20220522.dump


# /etc/dumpfiles 파일에서 저장된 파일시스템 백업 정보 내용
$ more /etc/dumpdates
/dev/sda1 0 Thu Apr 20 23:04:48 2023 +0900
/dev/sda1 1 Thu Apr 20 23:10:00 2023 +0900
/dev/sda1 2 Thu Apr 20 23:11:15 2023 +0900
■ restore 명령 - 사용법
$ restore [옵션] -f DeviceName
| 옵션 | 설명 |
|---|---|
| -t | 복구는 하지 않고 백업된 파일 리스트 정보를 확인하기 위해 사용 |
| -r | 전체 복구를 하기 위해 사용 |
| -i | 상호 대화형 모드에서 파일 복구를 하기 위해 사용 |
| -x | 부분 복구를 하기 위해 사용 |
| -v | Verbose Mode |
| -f DeviceName | 백업 파일의 경로와 이름을 지정 |
■ 예시
# restore 명령 설치
$ yum install epel-release; yum repolist; yum install restore


# /backup/test_L1_20220522.dump 파일 내에 백업 파일 목록 확인
$ restore -tvf /backup/test_L1_20220522.dump
Verify tape and initialize maps
Input is from a local file/pipe
Input block size is 32
Dump   date: Sat Apr 22 13:29:33 2023
Dumped from: Sat Apr 22 13:28:37 2023
Level 1 dump of /test on localhost.localdomain:/dev/sda1
Label: none
Extract directories from tape
Initialize symbol table.
dir          2  .
leaf        14  ./test4.txt
leaf        16  ./test6.txt


# 백업된 파일들 중에서 test4.txt 파일만 복구
$ mkdir /restore

$ cd /restore/

$ restore -xvf /backup/test_L1_20220522.dump ./test4.txt
Verify tape and initialize maps
Input is from a local file/pipe
Input block size is 32
Dump   date: Sat Apr 22 13:29:33 2023
Dumped from: Sat Apr 22 13:28:37 2023
Level 1 dump of /test on localhost.localdomain:/dev/sda1
Label: none
Extract directories from tape
Initialize symbol table.
Extract requested files
You have not read any volumes yet.
Unless you know which volume your file(s) are on you should start
with the last volume and work towards the first.
Specify next volume # (none if no more volumes): 1
extract file ./test4.txt
Add links
Set directory mode, owner, and times.
set owner/mode for '.'? [yn] y

$ ls -l
total 0
-rw-r--r--. 1 root root 104857600 Apr 22 13:29 test4.txt


# /backup/test_L0_20220522.dump 파일 내에 백업 파일 모두 복구
$ restore -rvf /backup/test_L0_20220522.dump
Verify tape and initialize maps
Input is from a local file/pipe
Input block size is 32
Dump   date: Sat Apr 22 13:28:37 2023
Dumped from: the epoch
Level 0 dump of /test on localhost.localdomain:/dev/sda1
Label: none
Begin level 0 restore
Initialize symbol table.
Extract directories from tape
Calculate extraction list.
Make node ./lost+found
Extract new leaves.
Check pointing the restore
extract file ./test1.txt
extract file ./test2.txt
extract file ./test3.txt
extract file ./test4.txt
extract file ./test5.txt
Add links
Set directory mode, owner, and times.
Check the symbol table.
Check pointing the restore

$ ls -l
total 1040
drwx------. 2 root root         6 Apr 22 13:06 lost+found
-rw-------. 1 root root   1062296 Apr 22 13:40 restoresymtable
-rw-r--r--. 1 root root 104857600 Apr 22 13:16 test1.txt
-rw-r--r--. 1 root root 104857600 Apr 22 13:16 test2.txt
-rw-r--r--. 1 root root 104857600 Apr 22 13:09 test3.txt
-rw-r--r--. 1 root root 104857600 Apr 22 13:09 test4.txt
-rw-r--r--. 1 root root 104857600 Apr 22 13:09 test5.txt
댓글 남기기