[CentOS] 14. WEB(Apache) + WAS(PHP) + DB(MariaDB)
카테고리: CENTOS
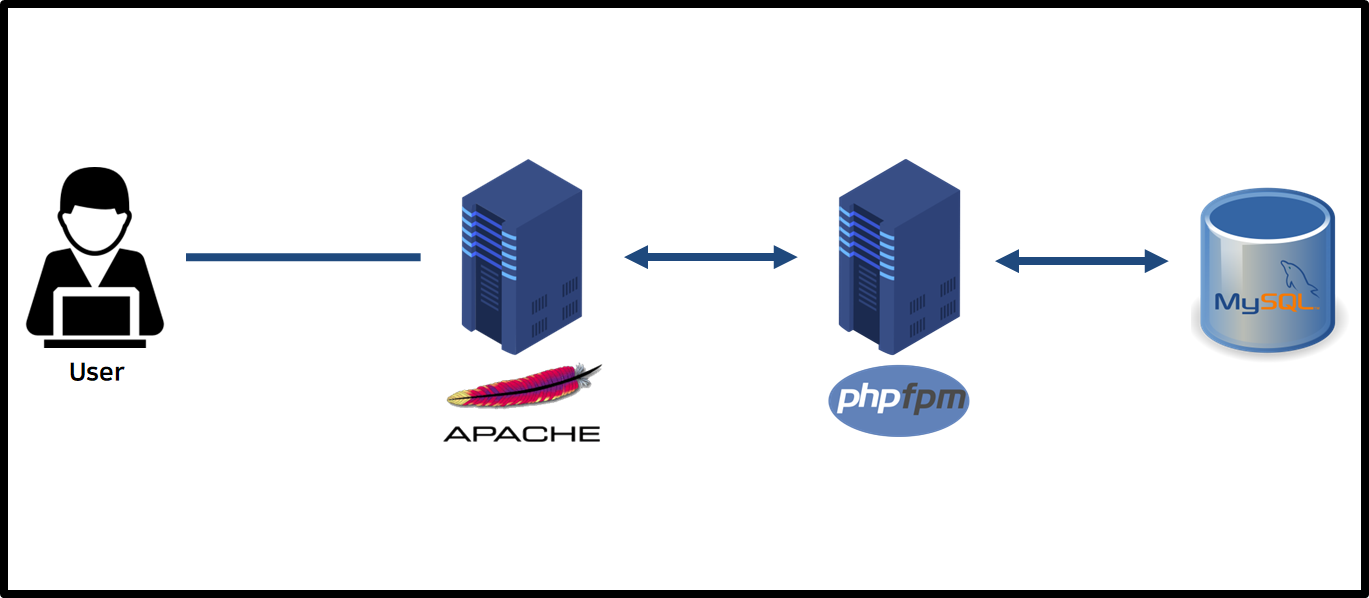
🔔 WEB 구성요소
02) 서버 정보

03) 서버 구성
a) WEB Server - Apache install and configuration
# /etc/hosts에 서버 IP 주소 정보 추가
$ cat <<EOF >> /etc/hosts

192.168.219.100 web
192.168.219.111 was01
192.168.219.200 db
EOF
# Apache 설치
$ yum -y install httpd
# /etc/httpd/conf/httpd.conf 파일에서 아래와 같이 추가
$ vim /etc/httpd/conf/httpd.conf

<VirtualHost *:80>
	ProxyRequests Off
	ProxyPreserveHost On
	ProxyErrorOverride on
	ProxyTimeout 600

    # WAS 서버를 2대 이상 사용하고 분산하고 싶을 때
    #<Proxy balancer://mycluster>
	#	BalancerMember "fcgi://was01:9000" route=1
	#	BalancerMember "fcgi://was02:9000" route=2
		#BalancerMember "fcgi://was01:9000" route=1 enablereuse=On max=5
		#BalancerMember "fcgi://was02:9000" route=2 enablereuse=On max=5
		# enablereuse 옵션을 통해서 WAS와 DB 간의 Connection Pool과 유사하게 Apache와 PHP-FPM 간의 미리 연결을 확보하여 Connection을 재사용 할수 있다.
		# enablereuse 옵션 사용시 사전에 검토나 고려가 필요한 부분이 있다.
		# enablereuse 옵션 미사용 때보다 php-fpm 에서의 프로세스 확보가 더 필요해 오히려 늦어지거나 저하 현상이 발생할 수 있다.
	#	ProxySet lbmethod=bytraffic
		# -> Load Balance 방법 : byrequests (요청별 분배), bytraffic (byte 트래픽 가중치 분배), bybussyness( 보류중 요청 분배)
	#	ProxySet stickysession=ROUTEID
	#</Proxy>
	#
	#<FilesMatch \.php$>
	#	SetHandler proxy:balancer://mycluster
	#</FilesMatch>

	<FilesMatch \.(php|phar)$>
		SetHandler "proxy:fcgi://was01:9000"
	</FilesMatch>

</VirtualHost>
# 서비스를 활성화하고 시작(start)하도록 지정
$ systemctl enable --now httpd

# 방화벽 허용
$ firewall-cmd --add-service=http

$ firewall-cmd --add-port=9000/tcp

$ firewall-cmd --runtime-to-permanent

# Apache가 네트워크 연결을 수행할 수 있도록 허용
$ setsebool -P httpd_can_network_connect on
b) WAS Server - PHP-FPM install and configuration
# /etc/hosts에 서버 IP 주소 정보 추가
$ cat <<EOF >> /etc/hosts

192.168.219.100 web
192.168.219.111 was01
192.168.219.200 db
EOF
# PHP 설치
$ dnf module list php
CentOS Stream 9 - AppStream
Name      Stream      Profiles                        Summary
php       8.1         common [d], devel, minimal      PHP scripting language

$ dnf module reset php

$ dnf module -y enable php:8.1

$ dnf module -y install php:8.1/common; dnf -y install php-mysqlnd
# /etc/php-fpm.d/www.conf 파일에서 아래 내용 추가
$ vim /etc/php-fpm.d/www.conf

listen = 9000
listen.allowed_clients = 192.168.219.100
# 서비스를 활성화하고 시작(start)하도록 지정
$ systemctl enable --now php-fpm

# 방화벽 허용
$ firewall-cmd --add-service=http

$ firewall-cmd --add-port=9000/tcp

$ firewall-cmd --add-port=3306/tcp

$ firewall-cmd --runtime-to-permanent

# Apache가 SELinux를 통해 원격 데이터베이스에 연결하도록 허용
$ setsebool -P httpd_can_network_connect_db 1
# 테스트 php 파일 생성
$ mkdir -p /var/www/html

$ cat <<EOF >> /var/www/html/info.php
<?php phpinfo(); ?>
EOF
c) DB Server - MariaDB Install
# MariaDB 설치
$ yum -y install mariadb-server mariadb
# 서비스를 활성화하고 시작(start)하도록 지정
$ systemctl enable --now mariadb

# 방화벽 허용
$ firewall-cmd --add-port=3306/tcp
# MariaDB 설정
$ mysql_secure_installation
# test 용 DB 생성
$ mysql -u root -p

$ create database test;

# 외부 접근 허용
$ GRANT ALL PRIVILEGES ON *.* TO 'root'@'%' IDENTIFIED BY 'PASSWORD';

$ exit;
d) WAS Server - DB connection check
# DB 연결 체크용 php 파일 작성
$ cat <<EOF >> /var/www/html/dbtest.php
WAS01
<?php
    \$host = '192.168.219.200';
    \$user = 'root';
    \$pw = '1234';
    \$dbName = 'test';
    \$mysqli = new mysqli(\$host, \$user, \$pw, \$dbName);

    if(\$mysqli){
        echo "MySQL 접속 성공";
    }else{
        echo "MySQL 접속 실패";
    }
?>
EOF
댓글 남기기